Code-Along Project With MapKit for SwiftUI - Part 3
MapKit for SwiftUI got some major additions for iOS17, let's see them together!


For iOS17 and Xcode 15 beta.
Exploring SwiftUI with MapKit can be quite fun.
In iOS 17 and macOS 14, MapKit has reached a new level with a few new additions for SwiftUI. Keep in mind that these views and modifiers are still in beta and are subject to change without notice.
This brief series of posts draws inspiration from the WWDC23 talk: WWDC23 - Meet MapKit for SwiftUI
This is a code-along project, the main branch has the starter project in Xcode, which is mostly empty. It should only display a map of your region.
You can check the 'completedProject' branch of the project on GitHub for the finished version: The GitHub repo with the project
The next episodes in this series will show how to display a route and how to integrate LookAround into your project.
Previously:
Part 1 - display default search results
Part 2 - Controlling the region being displayed
In this episode, we will be looking at the new camera in MapKit for SwiftUI.
Part 3 - Rediscovering the map camera!
The history
Apple Maps was originally released on September 19, 2012. Since then they improved a lot, but part of the original design included a feature called Flyover, introduced in Apple Maps with the release of iOS 6. Flyover is a feature that provides users with a 3D, bird's-eye view of certain cities and landmarks. It allows users to virtually "fly over" the terrain, buildings, and points of interest, providing a more immersive and visually appealing experience when exploring maps. This feature leverages detailed 3D models and satellite imagery to create a realistic representation of the selected locations. Since its introduction, Apple has continued to expand the list of cities and regions that support Flyover in Apple Maps.
I think flyover is an amazing idea for maps, setting the bar quite high for other map applications to follow. In the beginning, it was only available for selected cities, but kept expanding every year.
Here is where a map camera comes into play. At the time Swift had not been announced yet!
MKMapCamera is a class in the MapKit framework, which is used for displaying maps and location-related information on iOS and macOS applications. It allows developers to control the viewpoint, perspective, and orientation of the map camera, providing users with a more dynamic and customizable map viewing experience.
MKMapCamera was introduced with iOS 7, which was released by Apple in September 2013. It is primarily written in Objective-C, the programming language that was the standard for iOS and macOS development before the introduction of Swift.
The primary purpose of MKMapCamera is to offer developers fine-grained control over how the map is presented to users. It allows adjustments to various camera properties, including:
Center Coordinate: The geographical coordinate that serves as the center of the camera's view.
Altitude: The altitude (distance) from the map's surface.
Heading: The rotation angle of the camera, indicating which direction it's facing.
Pitch: The angle at which the camera is tilted towards the ground.
Roll: The roll angle of the camera, which determines the bank angle of the view.
By manipulating these properties, developers can create engaging and immersive map experiences. For instance, an app could use MKMapCamera to zoom in on a specific landmark, tilt the camera for a 3D-like perspective, or even create custom animations to smoothly transition between different viewpoints.
Here's a simplified example of how MKMapCamera could be used in Objective-C to adjust the camera properties:
// Create a new camera
MKMapCamera *camera = [MKMapCamera camera];

// Set camera properties
camera.centerCoordinate = CLLocationCoordinate2DMake(latitude, longitude);
camera.altitude = altitude;
camera.heading = heading;
camera.pitch = pitch;

// Apply the camera to the map view
[mapView setCamera:camera animated:YES];
MapCamera in SwiftUI
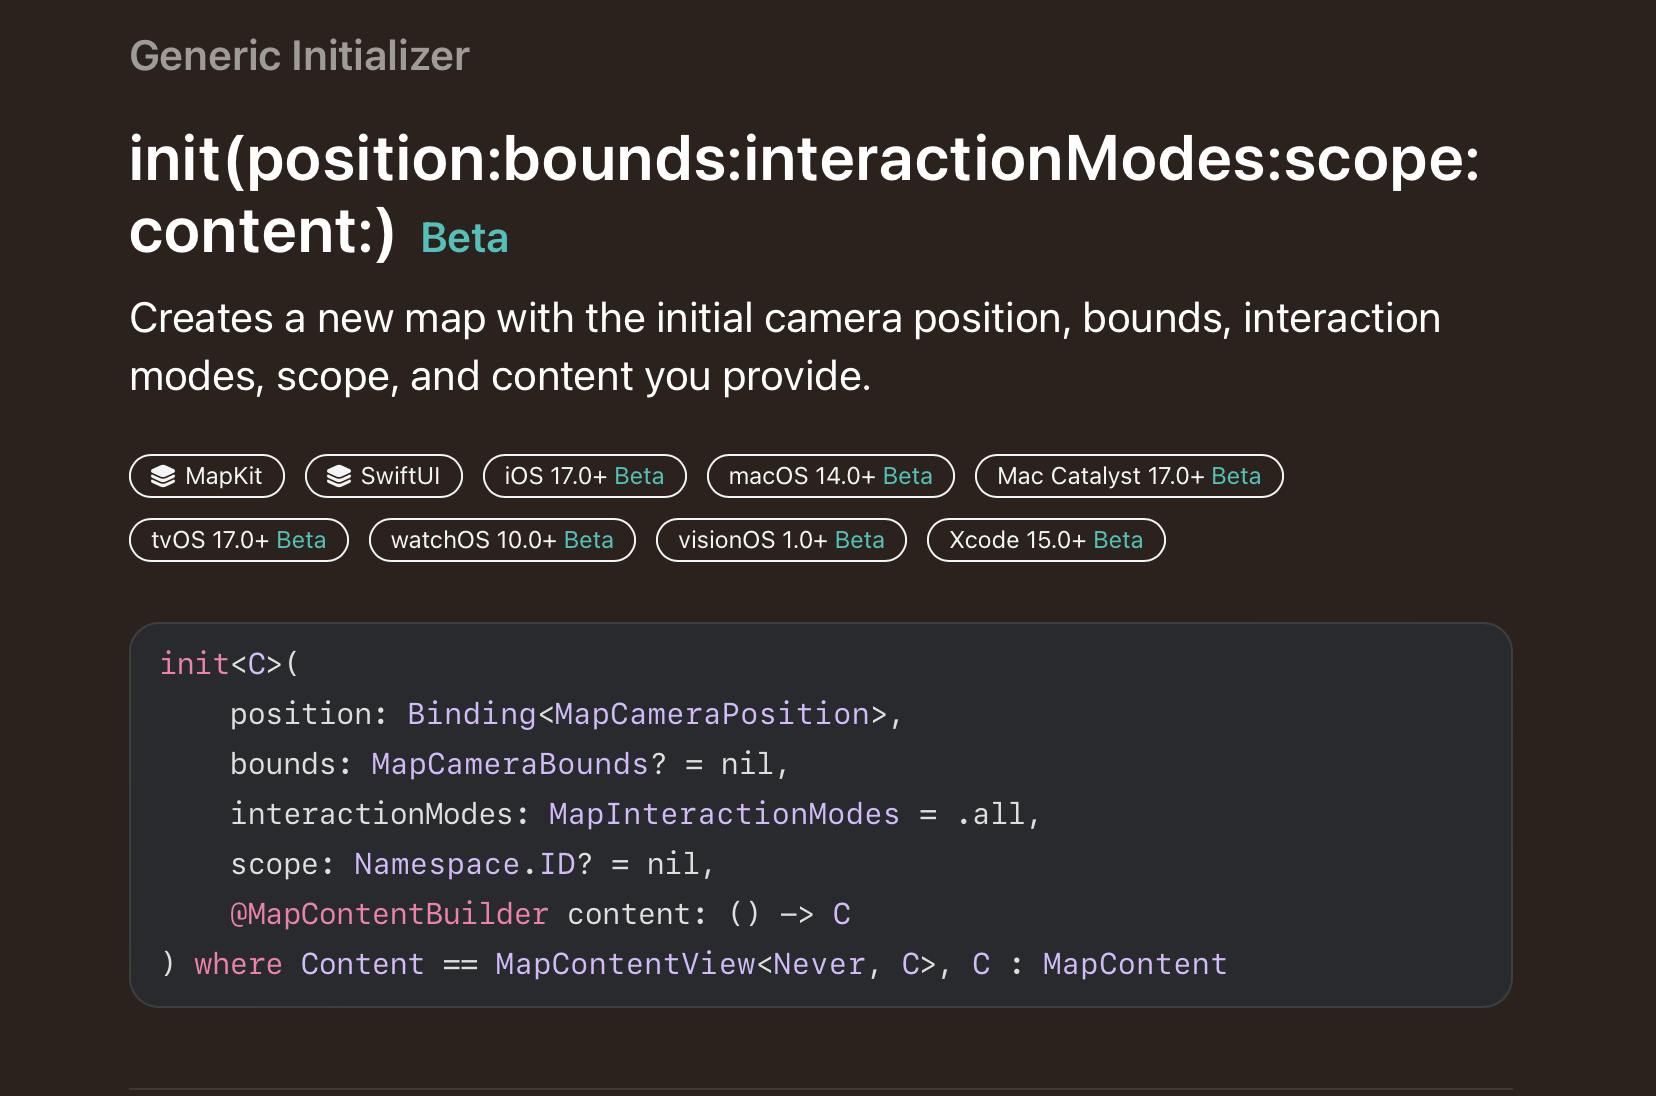
This year Apple has released a MapCamera beta feature for SwiftUI, as per the documentation:
MapCamera allows you to specify the viewpoint of a Map, as well as affect how MapKit presents the map to the user. To create a map view with a 3D perspective, MapCamera takes input from the camera and device: The location of the camera on the map. The compass heading indicates the camera’s viewing direction. The pitch of the camera relative to the map is perpendicular. The camera’s distance from the target point.
We will implement this in code. Keep in mind these features are still in beta and subject to change. I will just add a new file inside our project and display a small demo of the Mac camera features using the power of previews in SwiftUI:
Let's create a new SwiftUI file and name it "MapCameraView.swift".
Inside the body, we add our Map initialiser. The Map initializer can take a Binding to a MapCameraPosition as argument:
I want to show you the Notre-Dame Cathedral in Paris. So let's create this place as an extension of MapCameraPosition for convenience and then we will store it in our State and pass it to the init as Binding.
extension MapCameraPosition {
    static let notreDame: MapCameraPosition = .camera(
        MapCamera(centerCoordinate:
            CLLocationCoordinate2D(
                    latitude: 48.8530,
                    longitude: 2.3499,
            )
        )
        //The distance from the center point of the map to the camera, in meters.
        distance: 980,
        //The heading of the camera, in degrees, relative to true North.
        heading: 242,
        //The viewing angle of the camera, in degrees.
        pitch: 60
        ))
}
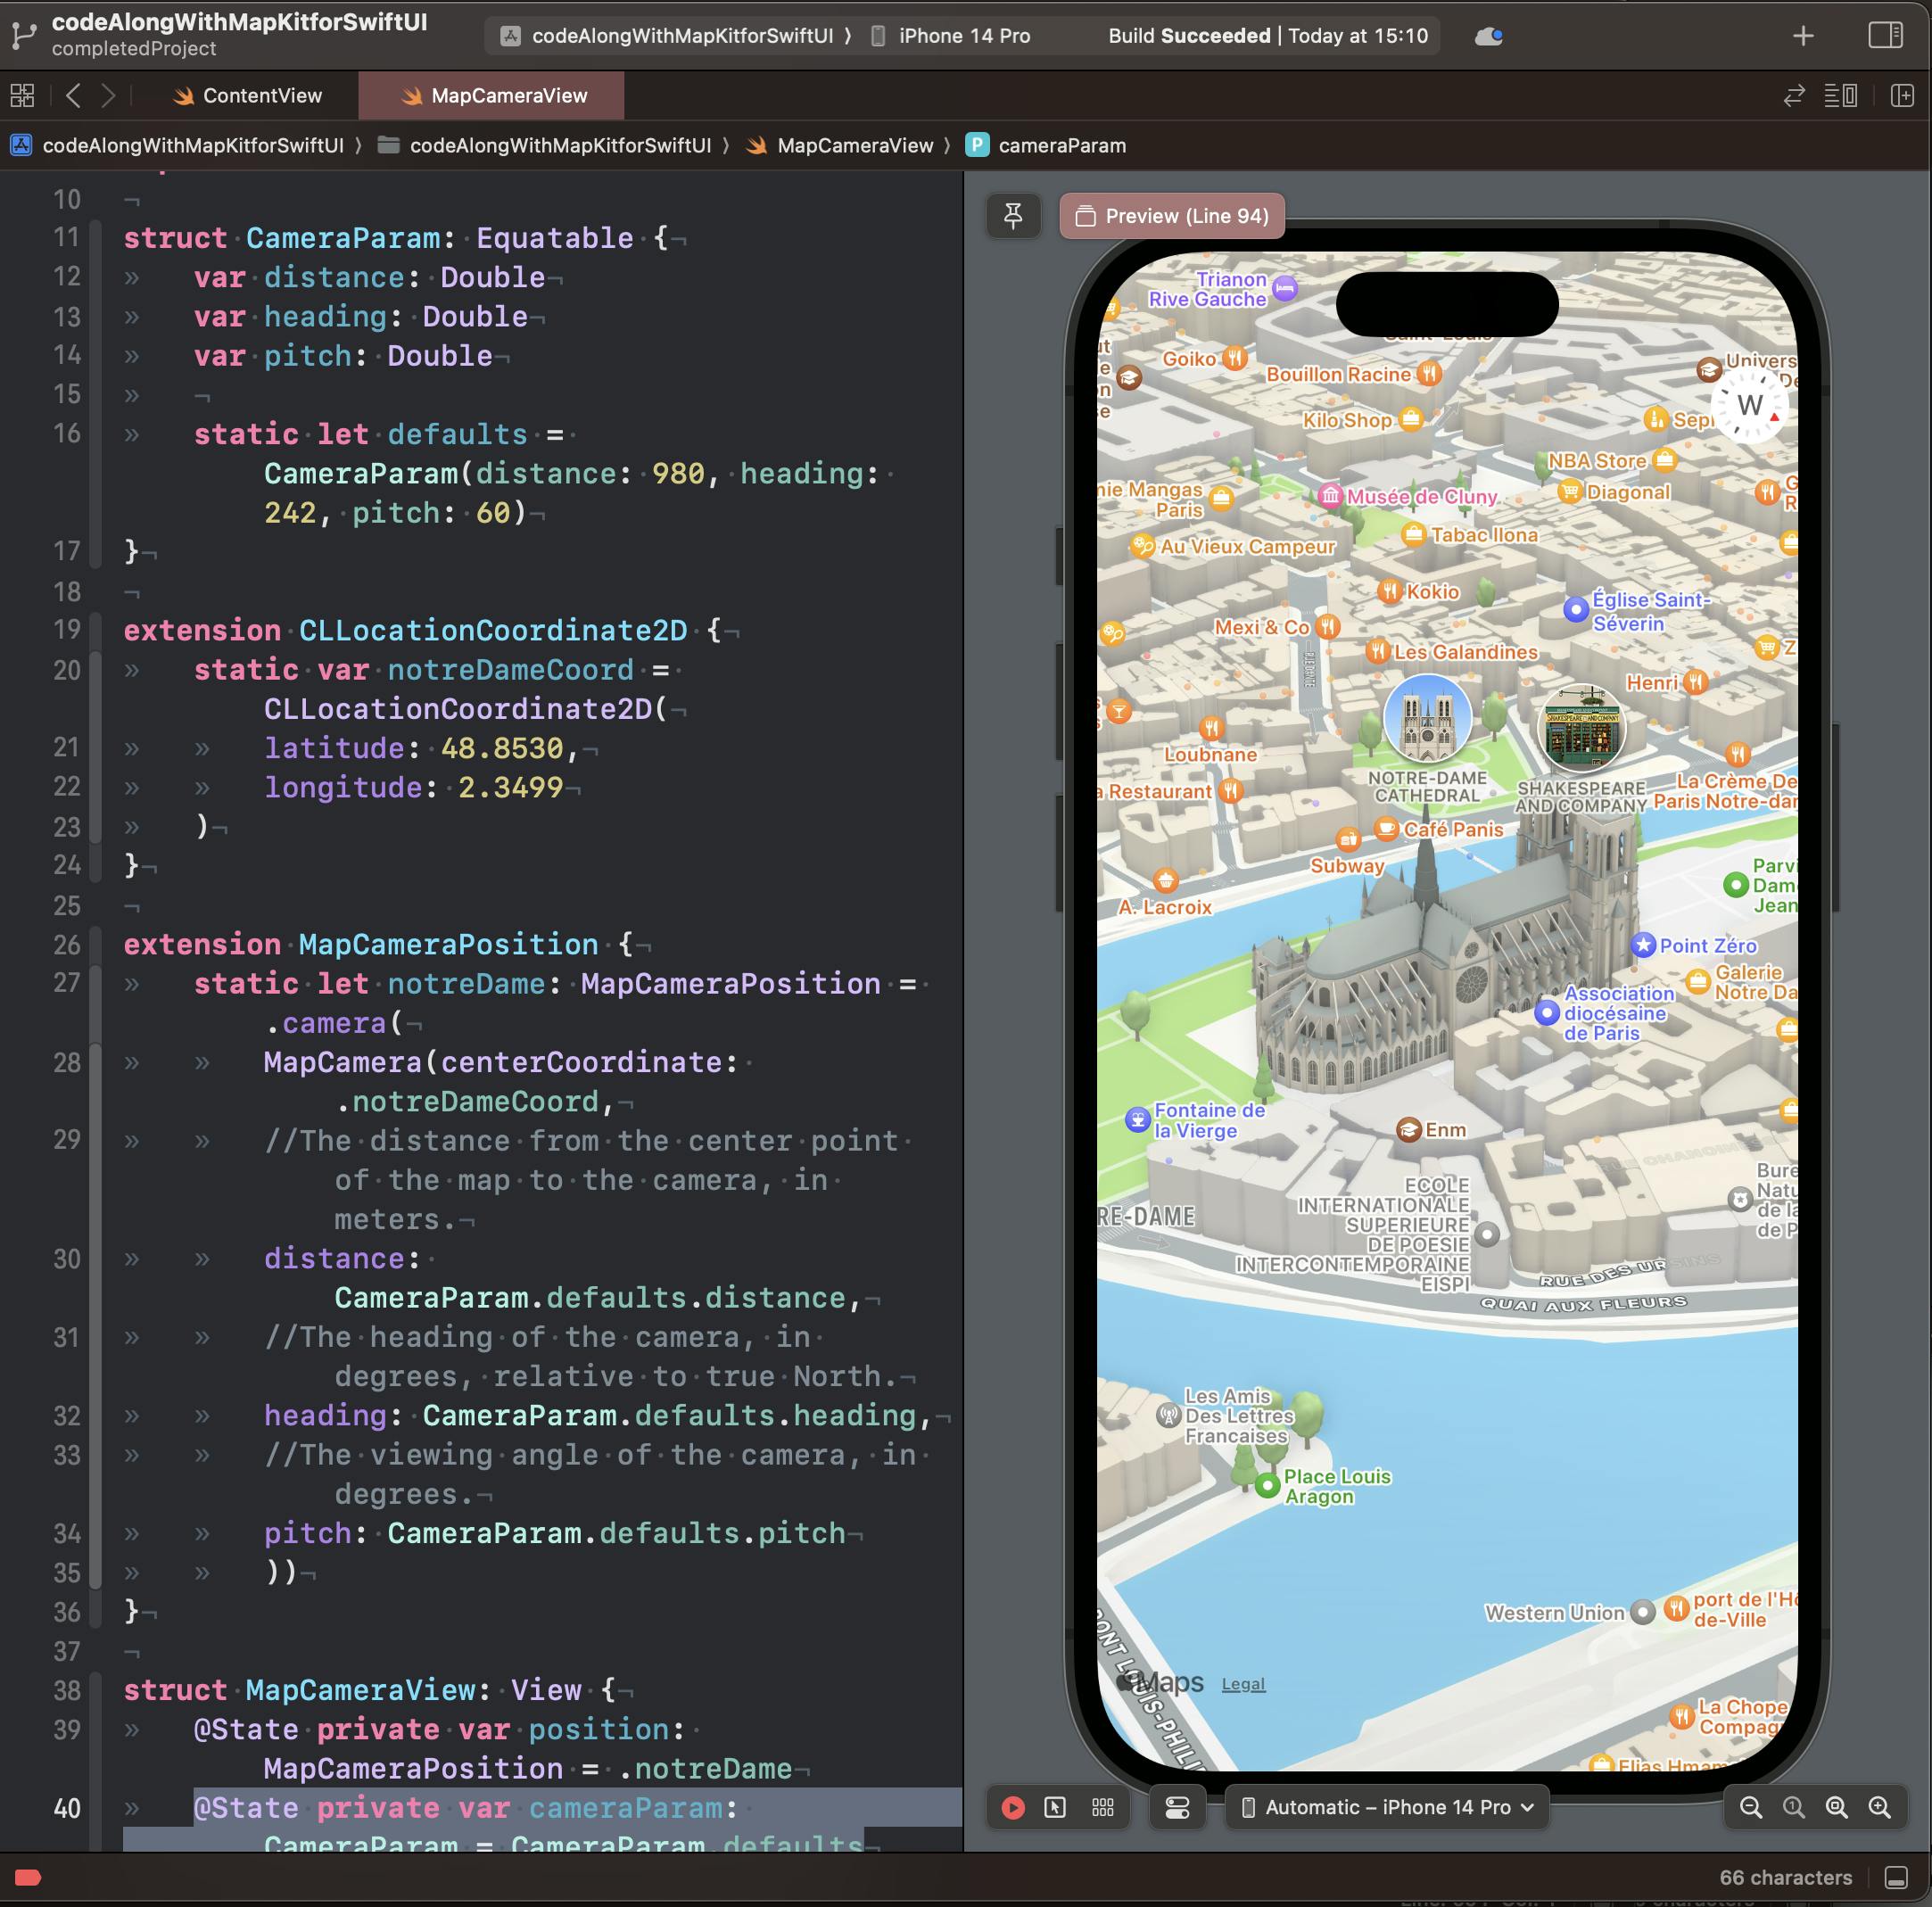
In the view, I add a state variable to track my position, it will be a two way binding. i want to be able to update my camera position as well.
@State private var position: MapCameraPosition = .notreDame
Inside the body, we initialize our map with our Binding:
Map(position: $position) {
    }.mapStyle(.standard(elevation: .realistic))
You should already see the cathedral in the preview :)
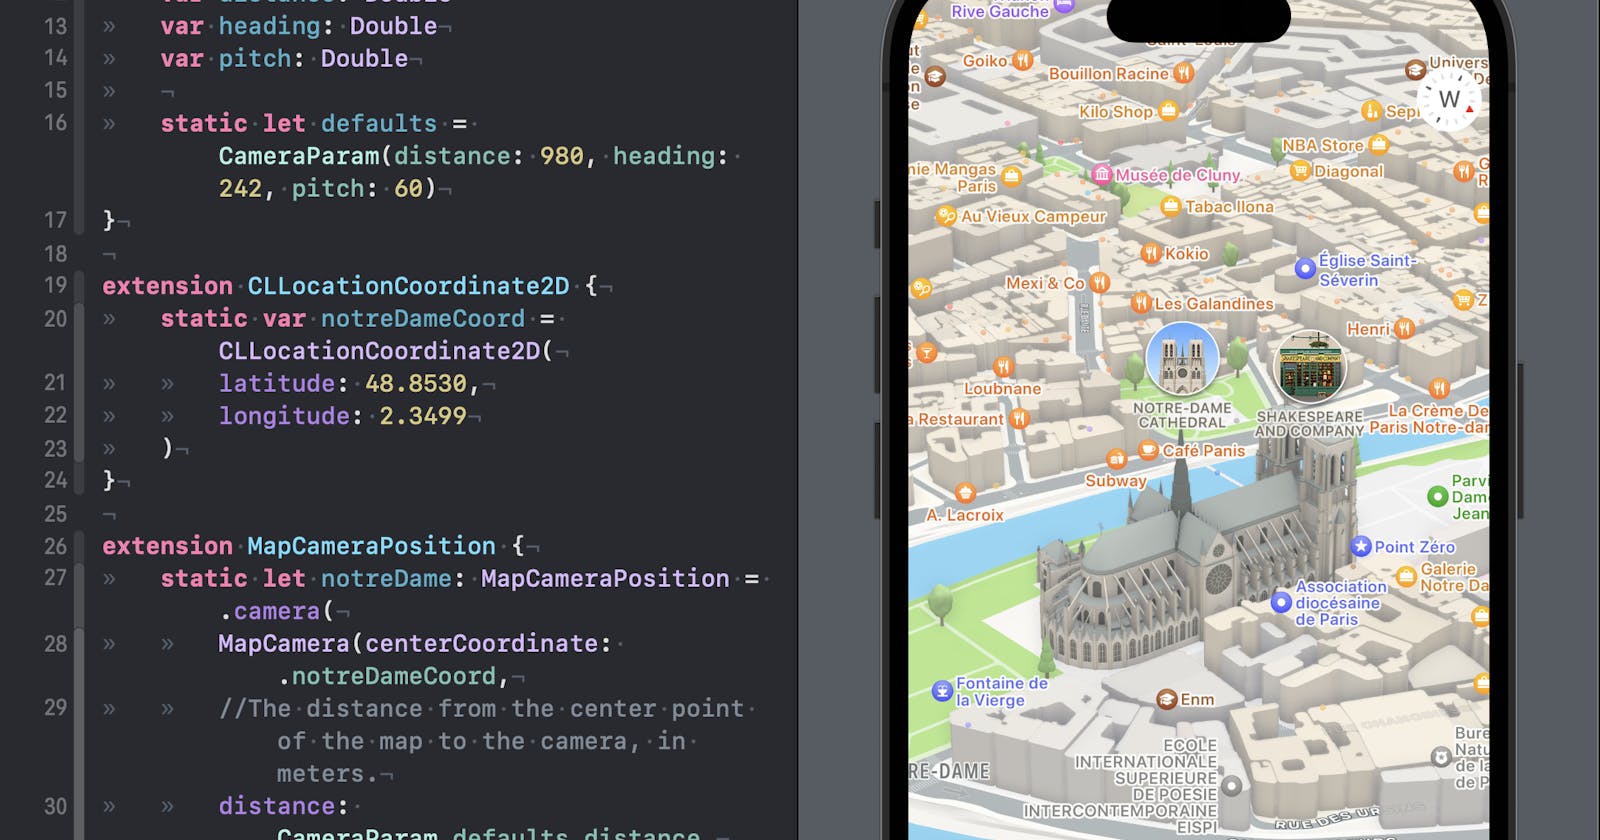
To show the preview I hardcoded the MapCameraPosition attributed. I will now refactor it to a struct to be able to change them how I want.
struct CameraParam: Equatable {
    var distance: Double
    var heading: Double
    var pitch: Double

    static let defaults = CameraParam(distance: 980, heading: 242, pitch: 60)
}
And because I did so in the previous part of the project I will extract the coordinates too:
extension CLLocationCoordinate2D {
    static var notreDameCoord = CLLocationCoordinate2D(
        latitude: 48.8530,
        longitude: 2.3499
    )
}
So our extension in MapCameraPosition will look like this now:
extension MapCameraPosition {
    static let notreDame: MapCameraPosition = .camera(
        MapCamera(centerCoordinate: .notreDameCoord,
        //The distance from the center point of the map to the camera, in meters.
        distance: CameraParam.defaults.distance,
        //The heading of the camera, in degrees, relative to true North.
        heading: CameraParam.defaults.heading,
        //The viewing angle of the camera, in degrees.
        pitch: CameraParam.defaults.pitch
        ))
}
And I add the CameraParam as a State variable as well.
@State private var cameraParam: CameraParam = CameraParam.defaults
This is what you should already be able to see now.
What I want to do is create a series of sliders for the camera parameters and see in real time how the view gets modified. For this, I will add the sliders in a form. I want to see the results of my modifications in real-time.
.safeAreaInset(edge: .bottom) {
        Form {
            Section {
                Slider(value: $cameraParam.distance, in: 10...1500)
            } header: {
                Label("Distance", systemImage: "chevron.up.circle")
            }

            Section {
                Slider(value: $cameraParam.heading, in: 0...360)
            } header: {
                Label("Heading", systemImage: "arrow.triangle.2.circlepath.circle")
            }

            Section {
                Slider(value: $cameraParam.pitch, in: 0...70)
            } header: {
                Label("Pitch", systemImage: "trapezoid.and.line.vertical")
            }
        }
        .frame(height: 280)
        .background(.thinMaterial)
    }
Nice sliders we got here! but playing with them will not move the camera position yet.
We need to update our position variable with the new values. For this we use the onChange modifier. We add the modifier on our map view.
.onChange(of: cameraParam) {
        // update the position
        position = .camera(
            MapCamera(centerCoordinate: CLLocationCoordinate2D(
                latitude: 48.8530,
                longitude: 2.3499
            ),
                distance: cameraParam.distance,
                heading: cameraParam.heading,
                pitch: cameraParam.pitch
            ))
    }
And this is the result.
It is great to see what we could accomplish with so little code 👨🏻💻
See the docs here: developer.apple.com/documentation/mapkit/ma..
That's it for today. See you in the next post of the series! :)
Relevant Links
The GitHub repo with the project