Code-Along Project With MapKit for SwiftUI - Part 4
Adding animations and flyovers.


For iOS17 and Xcode 15 beta.
Exploring SwiftUI with MapKit can be quite fun.
In iOS 17 and macOS 14, MapKit has reached a new level with a few new additions for SwiftUI. Keep in mind that these views and modifiers are still in beta and are subject to change without notice.
This brief series of posts draws inspiration from the WWDC23 talk: WWDC23 - Meet MapKit for SwiftUI
This is a code-along project, the main branch has the starter project in Xcode, which is mostly empty. It should only display a map of your region.
You can check the 'completedProject' branch of the project on GitHub for the finished version: The GitHub repo with the project
The next episodes in this series will show how to display a route and how to integrate LookAround into your project.
Previously:
Part 1 - display default search results
Part 2 - Controlling the region being displayed
Part 3 - Rediscovering the map camera!
In this episode, we will be looking at the animations in MapKit for SwiftUI.
Part 4 - Animations and Flyovers
Keyframes animation for iOS17
Keyframes in SwiftUI are great to give more control over animations, allowing for complex and coordinated movements. Unlike phases, that handle discrete states sequentially, keyframes enable simultaneous animation of all properties during state transitions. Once an animation is complete, SwiftUI smoothly transitions to the next state, maintaining continuity across all phases.
However, if you need to animate properties independently, keyframes become invaluable. They let you set specific values at defined times within an animation, with SwiftUI interpolating values between keyframes for seamless transitions. This allows you to animate multiple effects concurrently through separate tracks, each with its own unique timing.
Organized into tracks, keyframes animate specific properties, guided by the key path you provide. There are four keyframe types, each with distinct interpolation methods:
- LinearKeyframe interpolates linearly in vector space from the previous keyframe.
- SpringKeyframe, as its name suggests, uses a spring function to interpolate to the target value from the previous keyframe.
- CubicKeyframe uses a cubic Bézier curve to interpolate between keyframes. If you combine multiple cubic keyframes in sequence, the resulting curve is equivalent to a Catmull-Rom spline.
- MoveKeyframe immediately jumps to a value without interpolation.
Mixing and matching these keyframes within an animation offers ultimate customization.
While keyframes provide extensive control, they should be viewed as predefined animations, not a replacement for fluid, interactive SwiftUI animations. Consider them as video clips to be played, offering a wealth of control but with some trade-offs. Changing keyframes mid-animation is best avoided, as they don't gracefully retarget like springs.
Keyframes animate values that you define, which are then used to apply modifiers to the view. You can use a single keyframe track to drive a single modifier or a combination of different modifiers, giving you flexibility in your animations. Keep in mind that updates occur on every frame during a keyframe animation, so it's advised to refrain from performing resource-intensive operations.
Animating maps
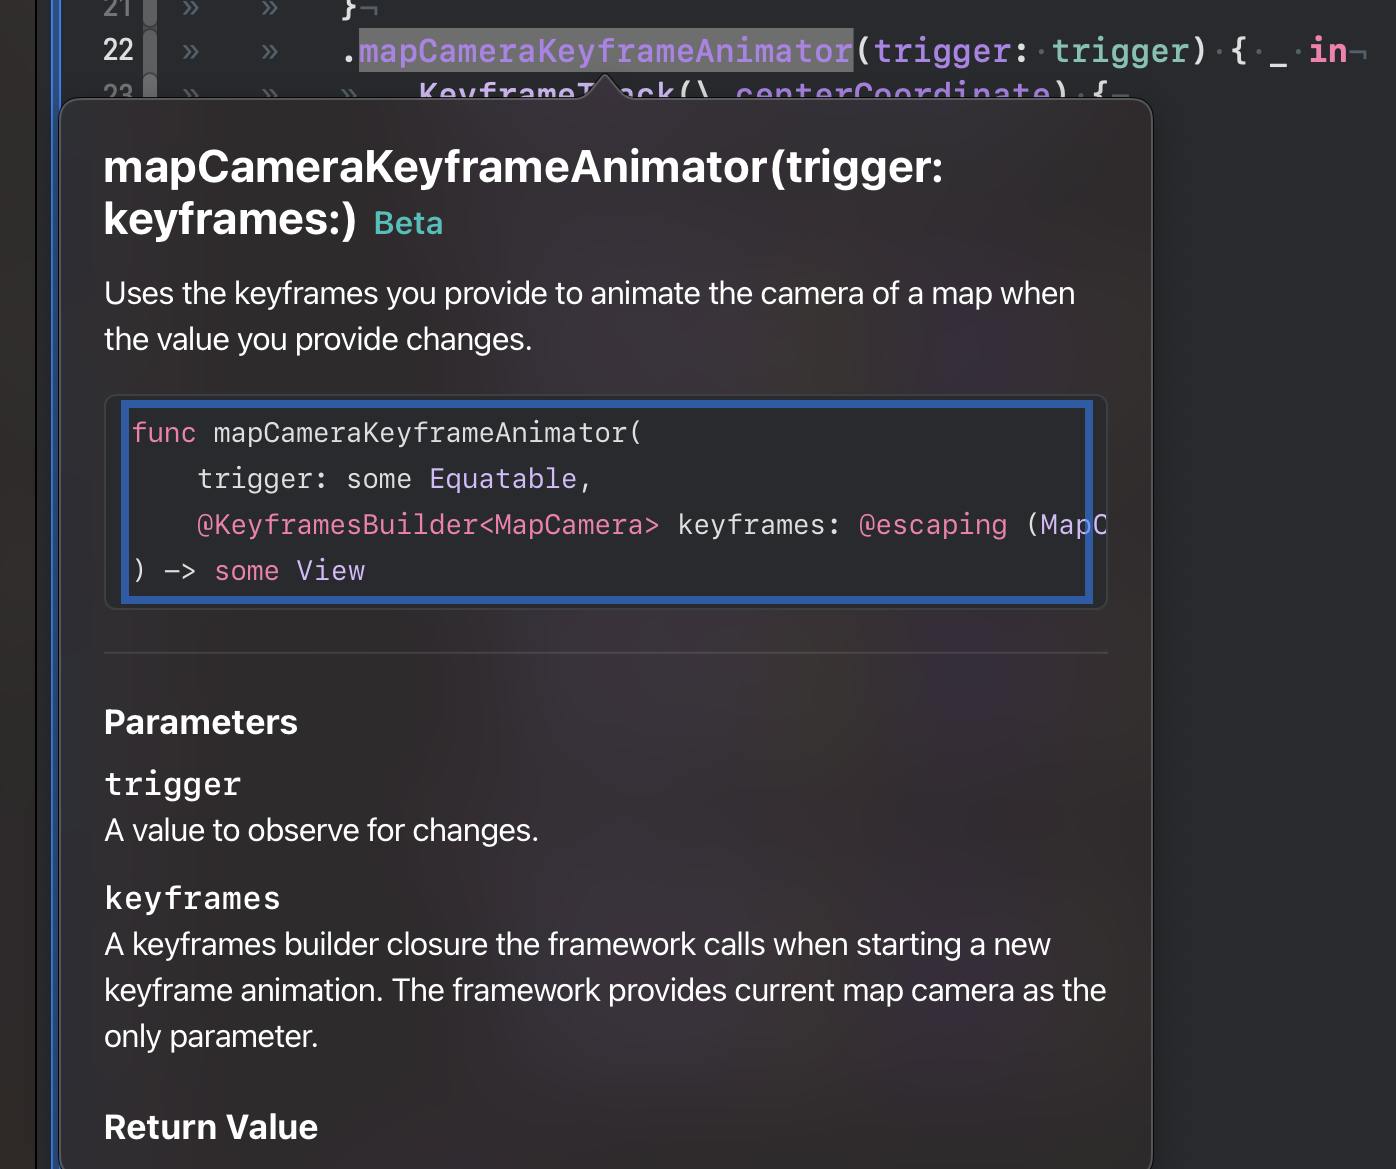
Apple went above and beyond this tyear. Not only the keyframe animations are great for all kind of data visualisation but they added a modifier especially for map animations: the mapCameraKeyframeAnimator
Our flyover
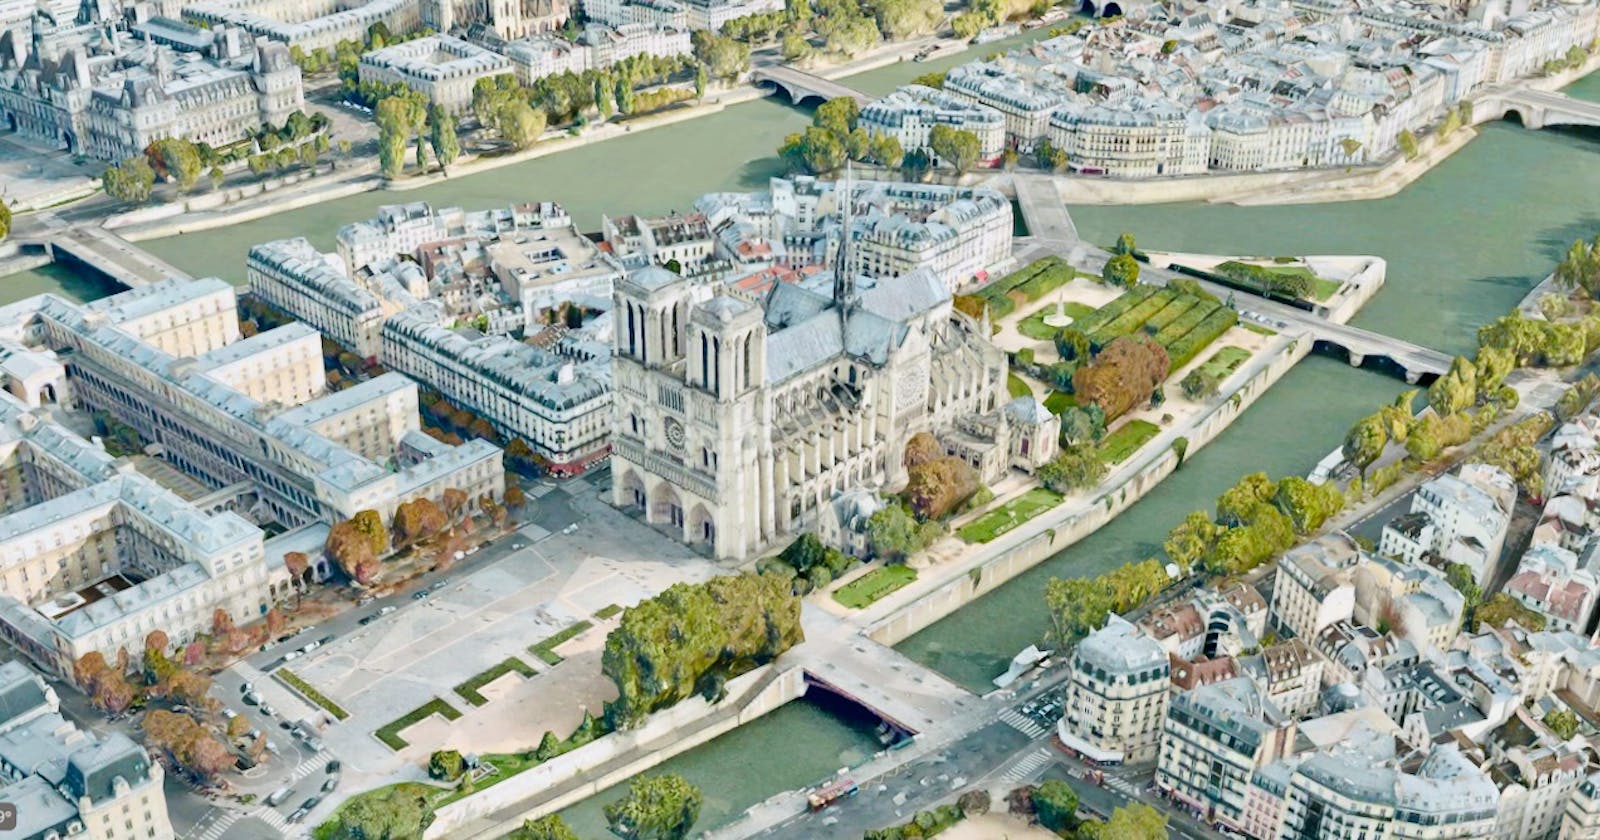
Apple Maps was originally released on September 19, 2012. Since then they improved a lot, but part of the original design included a feature called Flyover, introduced in Apple Maps with the release of iOS 6. Flyover is a feature that provides users with a 3D, bird's-eye view of certain cities and landmarks. It allows users to virtually "fly over" the terrain, buildings, and points of interest, providing a more immersive and visually appealing experience when exploring maps. This feature leverages detailed 3D models and satellite imagery to create a realistic representation of the selected locations. Since its introduction, Apple has continued to expand the list of cities and regions that support Flyover in Apple Maps.
I think flyover is an amazing idea for maps, setting the bar quite high for other map applications to follow. In the beginning, it was only available for selected cities, but kept expanding every year.
MapKit now allows me to use keyframe animations to move the camera!
Please see this WWDC23 session if you would like to know more about the new animations for SwiftUI in iOS17.
Wind your way through advanced animations in SwiftUI - WWDC23
In this post, we will continue working on our app. To demonstrate the map animations we will create a new SwiftUI file in Xcode and call it: "MapCameraAnimationView".
Here, I’m using a simple "Map" view to show the course.
We will reuse our CameraParam struct and the Notre Dame coordinates from last week
struct CameraParam: Equatable {
    var distance: Double
    var heading: Double
    var pitch: Double
}

extension CLLocationCoordinate2D {
    static var notreDameCoord = CLLocationCoordinate2D(
        latitude: 48.8530,
        longitude: 2.3499
    )
}
and we will add just one state variables in our view:
@State private var trigger = false
Again please see last week's post where we initialised the MapCameraPosition.notreDame property.
This will give us the starting point coordinates for our map and the CameraParam will provide the parameter to animate.
We use the new "mapCameraKeyframeAnimator" modifier. We give it the trigger value, and then add keyframes. The animation will be triggered when the view is displayed:
        .onAppear {
            trigger = true
        }
Every time the trigger value changes, maps will use these keyframes to animate.
The final value of the keyframes determines the camera value that is used at the end of the animation.
struct MapCameraAnimationView: View {
    @State private var trigger = false

    var body: some View {
        Map {

        }
        .mapCameraKeyframeAnimator(trigger: trigger) { _ in
            KeyframeTrack(\.centerCoordinate) {
                MoveKeyframe(.notreDameCoord)
            }
            KeyframeTrack(\.distance) {
                LinearKeyframe(900, duration: 8)
                LinearKeyframe(450, duration: 8)
                LinearKeyframe(350, duration: 8)
                LinearKeyframe(400, duration: 8)
                LinearKeyframe(400, duration: 8)
            }
            KeyframeTrack(\.heading) {
                LinearKeyframe(242, duration: 8)
                LinearKeyframe(360, duration: 8)
                LinearKeyframe(440, duration: 8)
                LinearKeyframe(480, duration: 8)
                LinearKeyframe(500, duration: 8)
            }
            KeyframeTrack(\.pitch) {
                LinearKeyframe(60, duration: 8)
                LinearKeyframe(70, duration: 8)
                LinearKeyframe(80, duration: 8)
                LinearKeyframe(90, duration: 8)
                LinearKeyframe(90, duration: 8)
            }
        }
        .onAppear {
            trigger = true
        }
        .mapStyle(.standard(elevation: .realistic))
    }
}
If the user performs a gesture while animating, the animation will be removed and the user will have full control over the camera.
By independently animating the centre coordinates, heading, and distance, we’re able to smoothly animate along this course and then zoom back out for a bird’s-eye view.
It is great to see what we could accomplish with so little code 👨🏻💻
See the docs here: https://developer.apple.com/documentation/mapkit/map/4231673-init
That's it for today. See you in the next post of the series! We still need to display searches and routes :)
Relevant Links
The GitHub repo with the project