Code-Along Project With MapKit for SwiftUI - Part 6
Plotting a route from a GPX file and adding annotations


(Photo by Michael Briguet on Unsplash)
For iOS17 and Xcode 15 beta, or now even RC :)
Exploring SwiftUI with MapKit can be quite fun.
In iOS 17 and macOS 14, MapKit has reached a new level with a few new additions for SwiftUI. Keep in mind that these views and modifiers are still in beta and are subject to change without notice.
This brief series of posts draws inspiration from the WWDC23 talk: WWDC23 - Meet MapKit for SwiftUI
This is a code-along project, the main branch has the starter project in Xcode, which is mostly empty. It should only display a map of your region.
You can check the 'completedProject' branch of the project on GitHub for the finished version: The GitHub repo with the project
Previously:
Part 1 - Display default search results
Part 2 - Controlling the region being displayed
Part 3 - Rediscovering the map camera!
Part 4 - Animations and Flyovers
Part 5 - En route with our map
In this episode, we'll dive into working with GPX files in MapKit for SwiftUI. It's worth noting that this tutorial is geared towards those with some prior familiarity with the delegate pattern.
Part 6 - Using a GPX file to draw a route
What is a GPX file?
A GPX (GPS Exchange Format) file is a standardized file format used to store GPS data, including waypoints, routes, and tracks. It was developed by TopoGrafix and is widely used for sharing GPS-related information across various platforms and devices.
GPX files are essentially XML files, meaning they follow the XML (Extensible Markup Language) syntax, which is a markup language designed for encoding data in a format that is both human-readable and machine-readable. This makes it easy to exchange GPS data between different applications and systems.
In iOS development, parsing GPX files involves extracting and interpreting the information contained within the XML structure. This is typically done using built-in frameworks like XMLParser, which allows iOS applications to navigate and extract data from XML documents. Developers can utilize this framework to access and use GPS data stored in GPX files within their iOS applications, enabling functionalities such as mapping, navigation, and location-based services.
When working with MapKit, displaying routes involves plotting a series of coordinates on a map to illustrate a path from one location to another. While MapKit provides tools for this, it's important to note that you cannot directly instantiate an MKRoute object to display a route on a map.
Instead, you'll need to use a MapPolyline to represent the route. A MKPolyline is a series of connected line segments that can be drawn on a map. To create a route using a MKPolyline, you'll first obtain the set of coordinates that define the route, typically from a source like a GPX file or a web service that provides directions.
Next, you'll use these coordinates to create an array of CLLocationCoordinate2D objects, which represent the points along the route. You'll then create a MKPolyline using these coordinates and add them to your map.
As per Apple documentation
An MKRoute object defines the geometry for the route — that is, it contains line segments associated with specific map coordinates. A route object may also include other information, such as the name of the route, its distance, and the expected travel time.
You don't create instances of this class directly.
The last sentence made me somewhat sad 😢. I am joking of course but Apple reserved MKRoute for use with the directions requests and it is fine. We will use MapPolyline to draw a route:
MapPolyline Apple Documentation
We will instantiate it from an array of CLLocationCoordinate2D.
Parsing the GPX file with XMLParser
Given that a GPX file encapsulates data in XML format, we can utilize XMLParser to extract the information necessary for our route. As a passionate cyclist, GPX files have been indispensable in my travels. For this exercise, I've employed a file sourced from bikepacking.com. You can see the route here.
XMLParser is a lightweight event based parser that which is read-only.This parser is known as a SAX parser which which stands for Simple API for XML. It is fast and does not keep the XML data in memory, instead it fires events while parsing an XML document.
it does not perform any validation and it is a read-only parser. This means we can't modify the XML nor can we write it to disk. We need to make sure to have a valid XML file.
We will be notified of the events as delegate of the parser using the XMLParserDelegate protocol. Therefore we will need three things:
Create the data structure, the GPXData class, that we want to populate from our GPX file. This class will contain our route and waypoints to display.
We need to create a parser class which will conform to the XMLParserDelegate protocol and will be notified of the events firing from the XMLParser. This will conform to NSObject because required by the XMLParserDelegate.
A State variable to contain the route data as an array of points which will be displayed in the MapPolyline in our SwiftUI map view.
Creating our data model for the route
In a real-world scenario, it would be best practice to put the model into a separate file and implement further decoupling. However, for the purpose of this blog post, we'll focus on making the model function with our data to demonstrate how the parser operates.
The GPX file I downloaded from the bike packing website looks like this:
<?xml version="1.0" encoding="UTF-8"?>
<gpx xmlns:xsi="http://www.w3.org/2001/XMLSchema-instance" xmlns:gpxdata="http://www.cluetrust.com/XML/GPXDATA/1/0" xmlns="http://www.topografix.com/GPX/1/0" xsi:schemaLocation="http://www.topografix.com/GPX/1/0 http://www.topografix.com/GPX/1/0/gpx.xsd http://www.cluetrust.com/XML/GPXDATA/1/0 http://www.cluetrust.com/Schemas/gpxdata10.xsd" version="1.0" creator="http://ridewithgps.com/">
  <author>RideWithGPS LLC</author>
  <url>https://ridewithgps.com/routes/30250612</url>
  <time>2019-06-12T02:13:49Z</time>
  <wpt lon="6.335894018411636" lat="43.80451999604702">
    <name>ALTERNATIVE</name>
    <sym>Dot</sym>
    <type>Dot</type>
  </wpt>
...
      <trkpt lat="43.8469" lon="6.22153">
        <ele>633.1</ele>
      </trkpt>
    </trkseg>
  </trk>
</gpx>
I have a header giving me the author and other metadata, then a series of waypoints with the <wpt>...</wpt> tag. Then the route as a series of tracepoints with coordinate and elevation data.
<trkpt lat="43.8469" lon="6.22153">
        <ele>633.1</ele>
 </trkpt>
I am interested in the coordinates and will skip the elevation in this implementation today. We have already some unwieldy amount of code ahead of us!
This is the model:
// our data model
struct GPXData: CustomDebugStringConvertible {
    // properties of the xml file
    var author: String = ""
    var url: String = ""
    var time: String = ""

    // properties computed by our parser
    var route = [CLLocationCoordinate2D]()
    var waypoints = [Waypoint]()

    var debugDescription: String {
        return "Author: \(author), url: \(url)"
    }
}
// to display a waypoint I need some more info so I made a separate struct
struct Waypoint: Identifiable {
    let id = UUID()
    var name: String = ""
    var coord: CLLocationCoordinate2D
    // this is a string defining the sf image to use
    var image: String = ""
    var background: Color = .brown
}
Creating the parser
And this is our parser, conforming to NSObject and XMLParserDelegate. We start adding some properties we will need:
class GPXParser: NSObject, XMLParserDelegate  {
    // will be assigned in the init together with the data from the gpx file
    var xmlParser: XMLParser?
    // temp variable to store the chars fired by the parser
    var xmlText: String = ""
    // instantiating an empty data model
    var gpxData: GPXData = GPXData()
    // need this to create a temp waypoint
    var currentWaypoint: Waypoint?

// continues
}
Bear with me, it will be a lot of code but I will try to explain as we go along.
As delegates we get notified every time an opening tag is found and also when a closing tag is closed. The text between them is saved to a temp variable that we also defined as xmlText .
We will use an instance of our XMLParser to "connect" and setting our class to be the delegate, and then we will get the updates from the XMLParser. This will happen in the init when we instantiate the XMLParser with our GPX file. So this will be our initializer, add this to the class:
    // We init with a gpx file in our bundle in this case but it could be on the web as well
    init(with gpxFilename: String) {
        // get the assets from the Bundle
        if let fileName = Bundle.main.url(forResource: gpxFilename,
              withExtension: "gpx"),
           let data = try? Data(contentsOf: fileName) {
            xmlParser = XMLParser(data: data)
        }
    }
We then will use three delegate functions provided by the XMLParserDelegate:
    // delegate function didStartElement
    // it will notify me when the element tag is found as a start. I will use it for the latitude and longitude params
    func parser(_ parser: XMLParser,
                didStartElement elementName: String,
                namespaceURI: String?,
                qualifiedName qName: String?,
                attributes attributeDict: [String : String]) {
        // reset temp text to be empty
        xmlText = ""
        // in this method we will only look at two elements and get their coordinates
        switch elementName {
        case "trkpt":
            // from the XMLParser we get strings
            guard let latString = attributeDict["lat"],
                  let lonString = attributeDict["lon"] else { return }
            guard let lat = Double(latString), let lon = Double(lonString) else { return }
            gpxData.route.append(CLLocationCoordinate2D(latitude: lat, longitude: lon))

        // the waypoints will start with wpt. Here we get the coord
        case "wpt":
            // here we are always at the begin of a new waypoint data so reset
              currentWaypoint = nil
            // again we get the strings
            guard let latString = attributeDict["lat"],
                  let lonString = attributeDict["lon"] else { return }
            // we convert to double
            guard let lat = Double(latString), let lon = Double(lonString) else { return }
            // I will append it when I get the name in the other parser delegate
            currentWaypoint = Waypoint(coord: CLLocationCoordinate2D(latitude: lat, longitude: lon))

        default:
            return
        }
    }

    // this is another parser method we get from the delegate. This one fires when we get a closing tag for an element. Ideal to get the values from the header. When we get at the end of the tag our temp xmltext var will be populated with the string inside the tags
    func parser(_ parser: XMLParser,
        didEndElement elementName: String,
        namespaceURI: String?,
        qualifiedName qName: String?) {
        // these are from the XML header
        if elementName == "author" {
            gpxData.author = xmlText.trimmingCharacters(in: .whitespacesAndNewlines)
        }
        if elementName == "url" {
            gpxData.url = xmlText.trimmingCharacters(in: .whitespacesAndNewlines)
        }
        if elementName == "time" {
            gpxData.time = xmlText.trimmingCharacters(in: .whitespacesAndNewlines)
        }
        // Waypoint property. adding the name, choosing image and color and then appending the waypoint to the array
        if elementName == "name" {
            guard var currentWaypoint else { return }
            currentWaypoint.name = xmlText.trimmingCharacters(in: .whitespacesAndNewlines)
            // check for the image to display
            if currentWaypoint.name.contains("CAMP") ||
                currentWaypoint.name.contains("SHELTER")
            {
                currentWaypoint.image = "tent"
                currentWaypoint.background = .brown
            } else if currentWaypoint.name.contains("Supermarket") {
                currentWaypoint.image = "basket.fill"
                currentWaypoint.background = .cyan
            } else {
                currentWaypoint.image = "mappin.circle.fill"
                currentWaypoint.background = .gray
            }
            // adding the name, image and color concludes the creation of
            //my waypoint which has been just appended to the gpxData.waypoints
            gpxData.waypoints.append(currentWaypoint)
            }
    }
    // this delegate method populates our temp file xmlText
    func parser(_ parser: XMLParser, foundCharacters string: String) {
        xmlText += string
    }
The last function in our parser is the one actually getting the data out:
    //This is not a delegate function. We call it from outside to get our gpxData parsed
    func parse() -> GPXData {
        xmlParser?.delegate = self
        xmlParser?.parse()
        return gpxData
    }
Displaying everything on the map view
In our map view we will use these state variables:
@State private var route: [CLLocationCoordinate2D]?
@State private var waypoints: [Waypoint]?
and in the body we will show a route and the waypoints when they become available:
Map {

        if let route {
            MapPolyline(coordinates: route, contourStyle: .straight)
                .stroke(.blue, lineWidth: 5)
        }

        if let waypoints {
            ForEach(waypoints) { waypoint in
                Annotation(waypoint.name,
                           coordinate: waypoint.coord,
                           anchor: .bottom
                ){
                    Image(systemName: waypoint.image)
                        .padding(4)
                        .foregroundStyle(.white)
                        .background(waypoint.background)
                        .cornerRadius(2)
                }
                //.annotationTitles(.hidden)
            }
        }
    }
    .onAppear {
        getRouteGPX(file: "TransVerdon")
    }
}
In the onAppear() modifier we call the getRouteGPX function to get the data flowing into our state variables and populate the map:
    // this function will convert the GPX file to an array of CLLocationCoordinate2D
    func getRouteGPX(file: String) {
        // reset the previous if any
        route = nil
        // instantiate the parser
        let gpxParser = GPXParser(with: file)
        let gpxData = gpxParser.parse()
        route = gpxData.route
        waypoints = gpxData.waypoints
        print(gpxData.debugDescription)
        }
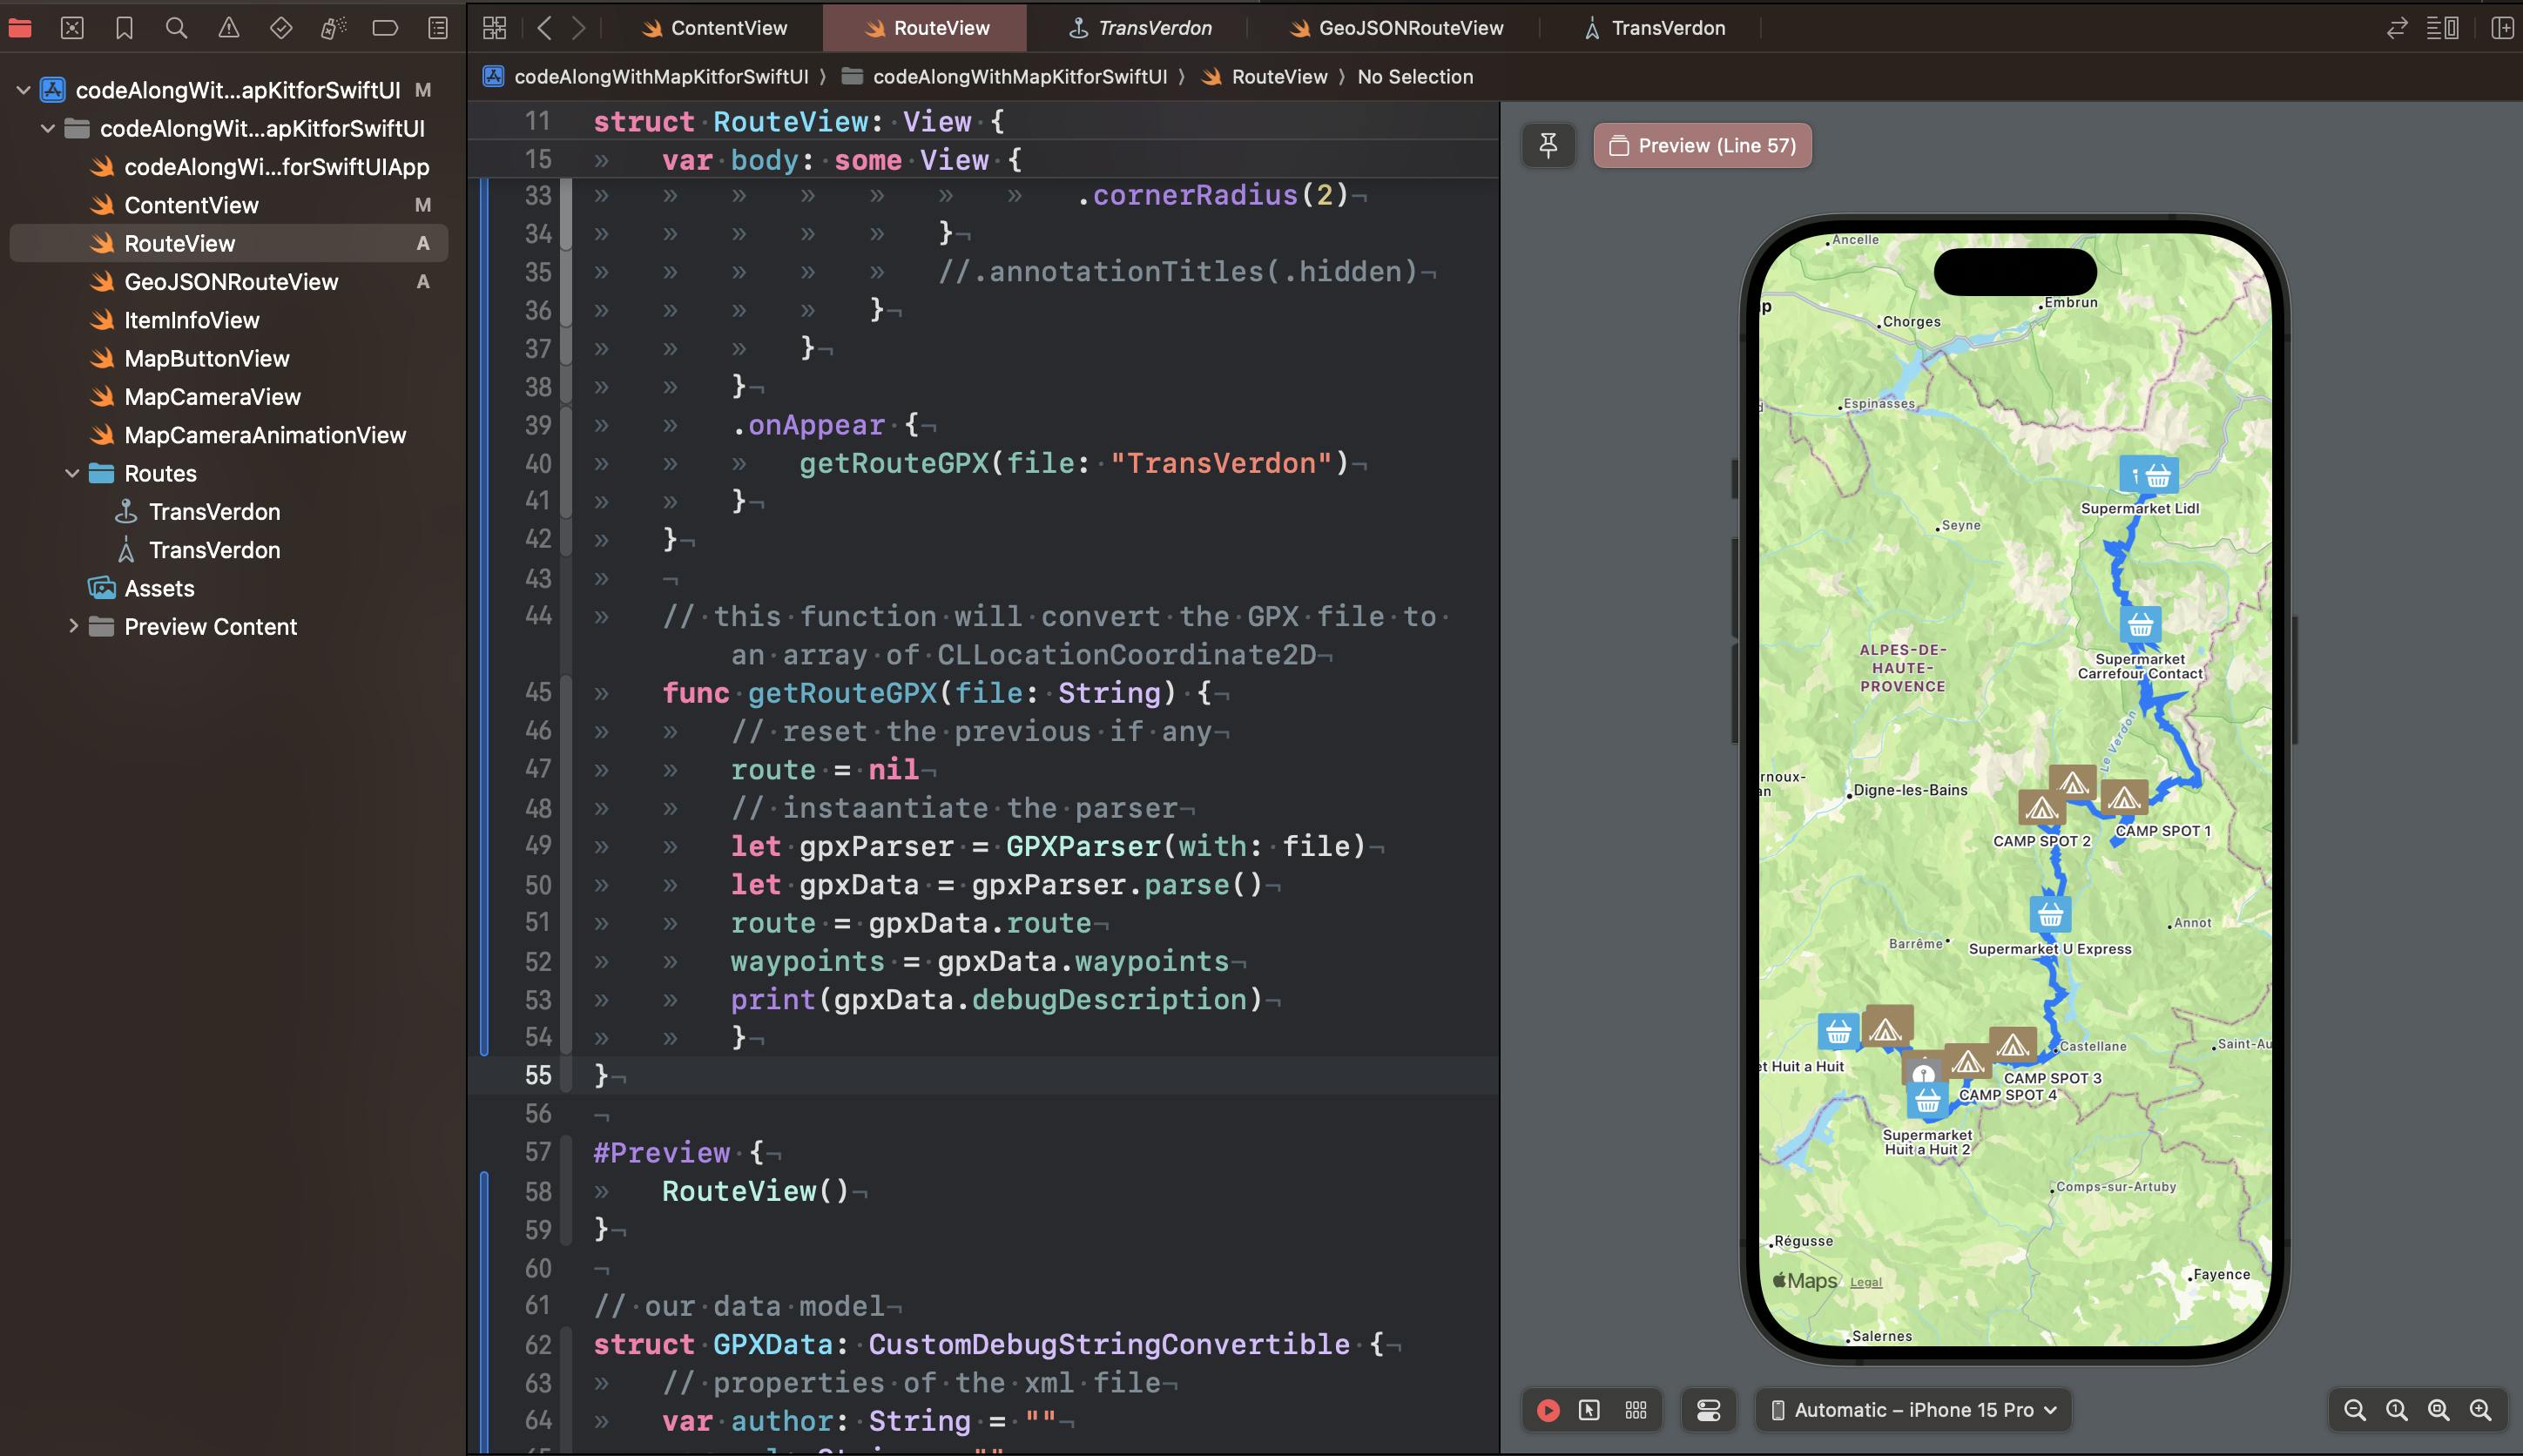
and this is our final result:
There are another ways to display routes. One of them is with a GeoJSON file. This is what we will see in a future episode. Stay tuned!
Relevant Links
The GitHub repo with the project